Showing posts with label Craft/DIY. Show all posts

Thursday, September 22, 2016

Basic Spiral Tie-Dye

If you are talking about color, one great and fun way to explore the fun is to tie dye!  Yes, it can be a task, I hope this makes it as fool-proof for you as possible.

What you need: 

Dye - I use Rit liquid  Found many places, $3 and makes a ton.
Squirt bottles
Gallon buckets or bowls
Shirt/Cloth
Rubber bands
Sturdy Ruler/Paint stirrer
Place to let dry

Steps: 

1. Lay out shirt, placing it front side down
2. Find the middle of the shirt, put the ruler end to the middle
3. Begin twisting the shirt, let it twist

4. Place the Rubber bands to hold the shirt edges in place, making a pie shaped wedges

5. Dye with squirty bottle, in pie shapes, with dyed are facing down, in a bowl.
Note: Remember to squirt and saturate BOTH sides of the shirt patty
6. Really concentrate the dye on the inner most part of the pie, saturating the shirt slice, dip the outside edge of the wedge in the run-off color.  No reason to waste it!
7. Continue around for each color of the rainbow
8. Squish, flat like a pancake
9. Rubber bands off
10. Ta da!

Notes: 

- The type of dye also depends on the fiber blend of the shirt.  Cotton works best
- Pay attention to washing instructions
-Some dye has a soda bath needed before beginning.  Read before doing!!!!
-I wear gloves, it helps.
-I just did this with 50 some of our after school program kiddos, K-high school.  So long as they respected the wedges and really saturated the shirt, they turned out awesome.
- I got about 3 shirts out of each squirt bottle (ketchup/mustard bottles from dollar tree), and I had 6 colors.  ($3 a color, 6 colors, $20 not counting shirts, it is pretty cost effective... and that will take care of about 50-75 shirts)

Squid Divers

AKA Cartesian Divers, are a great way to show air/water pressure, have a safe pet and more.

What you Need: 

plastic pipette
plastic glove (color is more fun)
scissors
electrical tape
nut
marker
bottle of water - less bottle design the better
12oz cup
water

Steps: 

1. Cut your plastic pipette near the bottom, with about 1/2" of stem.  I cut mine at the 3ml mark

2. Fold the stem in a 'U' shape (half, and half again) to fit it into the inside of the nut
3. Cut a full finger off one of the gloves.
Note: get powder free gloves.
4. Cut the smallest tip off the end of the finger,
5. Fit the squid body into the cut end, so it is 2/3 down the body
6. Tape the glove to the body.
Note: Don't use too much tape.  Weight is a consideration in this, the more tape, the more it weighs.  For mine 2" was enough.
7. Cut slits up to the tape in the glove.
 
Note: Slits up to the tape so no air bubbles get stuck in the "skirt" Bubbles cause lopsided squids
8. Fill the cup with water, place squid into the water, squeeze head to suck up some of the water.

Note: you want the squid to float just at the surface, if it goes down, it is too heavy, squeeze out a drop or two of water.  If it floats too much, suck some in.
9. Move the squid to the full (To almost the top) bottle of water.
10. Check buoyancy.  Water temperature can play havoc on buoyancy,  If it isn't floating dump water into a bowl, and try again.
11. When squiddy floats just right, tightly recap the lid.  With the lid tightly capped, squeeze the bottle hard.  The squid will sink when you squeeze.  

Monday, August 22, 2016

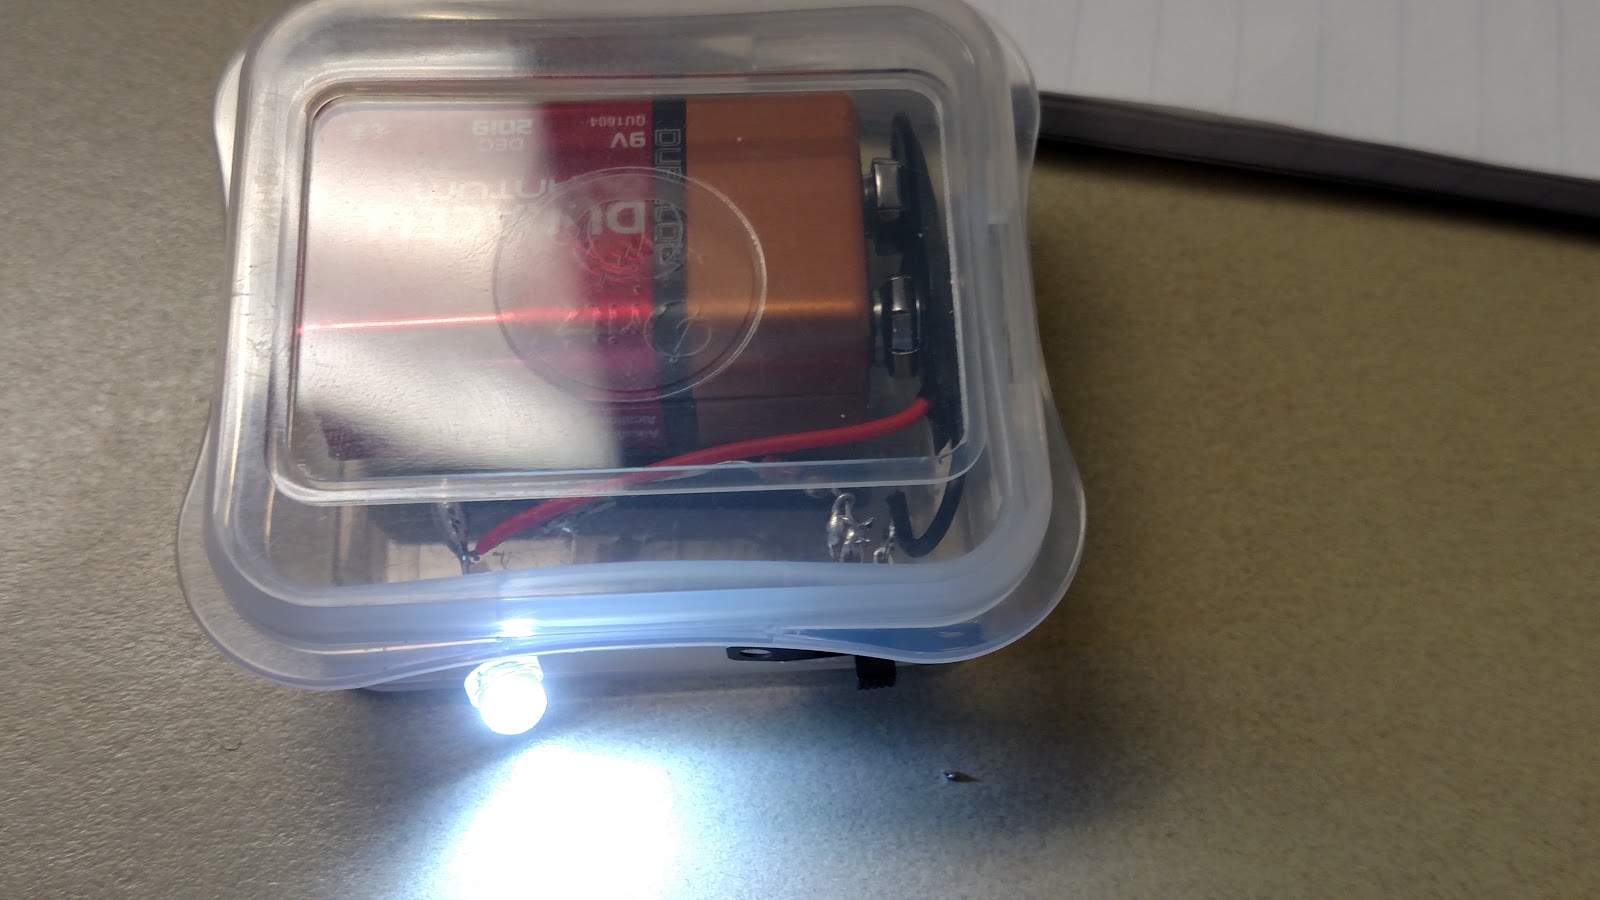
Simple Circuit - 9v LED flashlight

I loved electricity in school, and I love teaching it now.  People have a tendency to make electricity and circuitry really hard, and it doesn't have to be.  It is actually possible to make flashlights for quite inexpensive.

Supplies

3.0-3.2v white LED
220Ohm - 1/4 Watt - 5% resistors 
9v battery
9v battery connector
plastic case (mine were old pin cases) big enough for 9v+ some
SPDT toggle switch 
Soldering Iron
Solder
wire cutters

Directions

1.  Put holes in your plastic cases, if the 9v fits snuggly, not where it will make it tighter.  Make sure the holes cut are a snug fit for the led on one end, and the bottom of the toggle switch on the other end (but the toggle hole should be big enough that the whole toggle switch can fit through sideways.

2. Trim, and strip (1/2in) the ends of the connector wires so that they are the right size.  The black wire will go up through the toggle switch hole, the red to the LED hole.

3.  If too much electricity goes into a LED, it will fizzle out.  What resistors do is make sure only the correct amount of E- gets let through.  Above I linked to the amazon sellers where I got my stuff.  You will notice it is very affordable for a group activity.  If for some reason you only have 5v or something weird for LED here is how you find the appropriate resistor strength.  Not all resistors are the same, those little lines signify their power.  I will explain which end to solder to which part.  Make sure to read for resister end wire color vs 9v cap wire color

Sticking the two wires up through the hole, so as not to melt your container, solder the resistor's gold end wire to the middle of the toggle switch's bottom rung.

4. Solder the 9v cap's black wire to the end rung, making sure not to get solder between the two.  Then move the wires and bottom bit into the plastic, so it fits snuggly.

5. On an LED there are two legs. Stick those into the box through the LED hole.

The positive leg is the longer leg, negative shorter.  In electricity negative=black=cathode, red=+=anode.  My brain thing to remember that is not a true reminder, but works for me (black cat(hode)s are bad(negative)).

Solder the resistor's red ring wire end to the short leg of the led

6. Now solder the red wire from the 9v cap to the long leg of the LED (see above)

7. Snap the 9v cap on the 9v, and flip the switch.  It should GLOW!


Notes: 
1. Electricity can be dangers if handled inappropriately, learn more about electricity here

2. In order for a circuit to work, there must be a completed circle for the energy to travel.  The toggle switch breaks that.  See explanation here.  More about circuits here

Tuesday, July 12, 2016

Spy Periscope

This past week I let a Spy Camp, which was a total blast.  One of the things the students wanted to make that I hadn't even thought about was a spy periscope to see around corners.  "Whelllll... um, sure. Give me 5 minutes to figure it out."  So as the students worked on their hollowed out books I set myself to the task.  I googled it first (because why reinvent when you can borrow).  I found a pattern that used cardboard orange juice cartons.  I didn't have those in such short notice but I could make a long square prism... So here is what I came up with.  It all worked pretty smooth actually.

You will need: 

2 8.5"x11" cardstock papers
ruler
sissors
pencil
mirror
tape

Instructions: 

1. Do the following with BOTH sheets of paper!
Across the top and bottom of the page make a mark on the 2", 4", 6", and 8" (This give you 4 x 2" areas and a .5" area)

2. Draw a line from the top 2" to the bottom 2", and so on with each line till you have 4 vertical lines.

3. Keeping the page vertical, draw a line 1" up across the bottom of the page.  In the second column only, draw a horizontal line 2" up from the bottom and 4" up from the bottom.  That should create a window space only in the 2nd column.  (see above)

4.  Fold on all the vertical lines.
5. Now cut out the second column window.
6.  Fold into a rectangular prism and tape shut
7.  Cut your mirror into rectangles 1 3/4" by 2 3/4" .  Then using tape insert mirror on the inside wall of the prism opposite the window, so that the top of the window and the top of the mirror line up.
These do line up on the left, but the angle of the picture is off.
In this the tube-y part is to the left, the opening is to the right. 
8. Angle the mirror so the bottom of the mirror touches the opening of the window. Then tape it so it stays in that diagonal (45 degree) angle.  If sitting on the table when you look into it, you should see the ceiling.  
See my fingers reflection in the window from my hand at the top?
9. Now, that 1" marking across the bottom, cut the corners up to that marking. We will fold those into overlap creating a closed end, and tape them secure. 

10.  Now with the open ends facing each other, and the windows facing in opposite directions, insert one prism into the other.  You may need to bend them a little bit. Now go to a corner and see what is around the way! 


Friday, July 8, 2016

Confetti Poppers

As the name of this blog implys, I adore all things shiny.  A friend once told me my spirit animal is a disco ball.  So, truly anytime I can add glitter, I am a happy crafter.

This craft is one that can be modified for time of the year, and size.

What you will need: 

Tissue paper
Glitter/confetti
Construction Paper
Sissors
Tape
Ribbon

Steps: 

1. Get your piece of tissue paper.  I cut mine aproximately 1'x1'... Really I opened the really long sheets, and cut them in 1/4ths.

2. Get two pieces of construction paper and place them on your tissue paper, 2/3rds of the way down on the left and right sides of the tissue, we want there to be a tiny gap between the construction paper where you can see the tissue paper.

3,  Tape the constrution paper at the top and bottom, MAKE SURE THAT THE TAPE DOESN'T CROSS INTO THAT MIDDLE GAP.

4. Add the goodies into the very middle of the paper.  Keep there in a pile.  Be careful through out to make sure that the goodies don't fall out the end.  (this can be done instead between steps 7 and 8)

5. Keeping the middle gap vertical, carefully roll it all into a tube.  When rolled my tubes are about 1.5" in diameter.  The goal is to have a tube to put the glitter/confetti in.

6.  Tape the tube so it stays rolled (horizontally on the edge of the tissue paper), MAKE SURE THAT THE TAPE DOESN'T CROSS INTO THAT MIDDLE GAP.

7.  About 2"-3" from the left edge tightly tie the string, The string should scrunch all the tissue/construction paper together and make it so nothing put inside can fall out.

8.  Tie off the right side the same as the left.

9. TIME TO POP 'EM
                  Holding the areas to the outsides of the string ties, pull apart and up.  (If you pull apart and down, it will all open on the floor.  If you do it up, the goodies rain down on you from above.)

Notes: 

If made a smidge bigger you could put small individually wrapped candies in here.  Yum and Fun!  
The reason for the middle vertical gap is so that it breaks open cleanly, if not there, it tends to break off near a tie.  

Have fun and Enjoy!!!


Tuesday, June 7, 2016

Paper Beads

I don't know if anyone remembers these, but I recently came across a craft I used to do all the time growing up.  Paper beads are quite simple to do, And really inexpensive!

Supplies
Paper (white printing paper is fine)
Permanent Markers
Ruler
Scissors
White School Glue
Chopsticks or Bamboo rods
Exacto Knife

1. On a sheet of printer paper (8.5"x 11") across the top edge using a ruler, mark the .5" increments (.5", 1.5", 2.5", 3.5", 4.5" etc) on the bottom the 1" increments (1", 2", 3", etc)


2. Draw from the bottom left corner of the paper to the top left dot.  It will be a slightly diagonal line.  Then from that same first dot on the left at the top, to the left most dot on the bottom.  Then from the bottom left most dot to the second dot from left at the top. Continue this pattern till you have a page of triangles.


3. Cut on the lines, you should get 18 identical triangles, and two that are not the same (those 2 you can toss, or save for a different shaped bead).


4. On the non-line side of the paper, color the paper.


5. Get a chop stick.  CAREFULLYsplit the end of the stick in 3rds using a blade or exacto knife.


6. Place the Wide part of the triangle in a portion of the stick, and start rolling it around, keeping the paper taught (but not too tight).  Watch and keep the rolling even.


7.  As you come near the end, put some glue on and continue to wrap.  As the glue smooches out when rolled, rub it over the rest of the bead to coat the outside (keeping all the bead sealed)


8. To pull the bead off, pinch the bead in place and rotate in the opposite direction (only loosening it from the stick, then pull off the end - being sure to keep the paper in it's place.

9. Let dry, then you can spray with a sealant if you so choose!

Wednesday, April 27, 2016

Grass Heads / Chia Heads

Everyone remembers the chia pets from a decade or two ago.  Below was my brilliant mother's way to DIY it.

You will need: 
Pantyhose
Sissors
Grass Seed
Planting Dirt
Small Rubber Bands
Googly Eyes

Instructions:
1.  Cut Pantyhose into 6" tubes.
2. If using the toe, you can skip this step.  Otherwise, tightly band off/knot one opening.  Turn the tube inside out so the knot is inside.

3. Add about a Tablespoon of grass seed
4. Add about a cup of dirt, and really pack into the bottom.
 ** Warning** if you didn't tie off the rubber band tight enough (like a bajillion times) it may pull loose.  Not that tightly packed,

5.  Add rubber band to tie off the top of the hose, as close to the dirt as possible.  Make sure it is banded as many times and as tight as possible.  Cut excess Pantyhose

6. Flip over.  The visible knot is now the bottom, the grass seeds will be on top.

7. Grab a small bit of hose and dirt to make a nose, rubber band it

8. Glue (Hot glue works best for this) googly eyes above nose and below hair.
9. Put in a low disposable bowl, or shallow cup.
10. Water and watch grow!  The first time you water, make sure to get saturate the grass seeds.